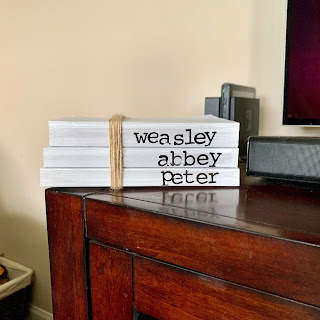
Farmhouse Book Stack DIY
Since the Spring I’ve been seeing farmhouse style book stacks all over Instagram. I think they’re so cute and they would be the perfect addition to our tv console in our living room. I couldn’t find any under $20 for a set of 3, and most were $25+ dollars, plus shipping, but that didn't matter because I thought 'Oh I can DIY that!'. Spoiler alert- I never did.
Back in June Amber at Wife on a Dime posted a brief Farmhouse Book Stack DIY. Her post confirmed my 'I can DIY that!' thought I had in the Spring and also gave some helpful tips. The day after seeing Amber's post I started the project. Of course, no projects are ever as easy to actually do as they are in your head and I learned a couple things while completing this project that I want to share with you!
- Buy paperback books from the Dollar Tree! Each of the books you see pictured cost $1, making the total cost for the books $3. The first time I attempted this project I bought three hard cover books from Goodwill. It cost me $4, but the cost wasn't the issue, white washing the books was. {I'll talk more about white washing in a second.} I started out using hardback books because I like the way they look, or so I thought. When I white washed my books I realized my paint wasn't going to cover where the title and the author's last name was 'carved' into the spine. No matter how many coats of white wash I did you could still see the title of the books and the last names of the authors. It looked awful. That's when I decided to use paperback books and they worked like a charm!
- White wash your books using the following steps:
- Use a foam brush to paint two to three coats of white paint on the spine and front cover of your books. This is called white washing.
- Using a paint color of your choice {I chose heather gray.} and a regular paint brush, paint two coats of paint on the spine and front cover of your books.
- Using your foam brush, paint one coat of white paint on the spine and front cover of your books.
- Stamping for me was a learning process too and thankfully I was smart enough to practice on the hardback books I bought. I used a set of stamps I got on clearance at Michaels and black ink. I stamped each stamp on the ink pad, used a baby wipe and paper towel to clean off the excess ink, and then stamped the stamp on the spine of the books.
I allowed the stamps to dry overnight and then set the ink with Modge Podge Clear Acrylic Sealer {I like the matte finish better than the glossy finish.}, stacked them, and tied twine around them.
***Please note that none of the links in this blog post are affiliate links. When I'm working on projects I find it helpful to see the exact products that were used. The links provided in this blog post are just for that purpose.


Comments
Post a Comment